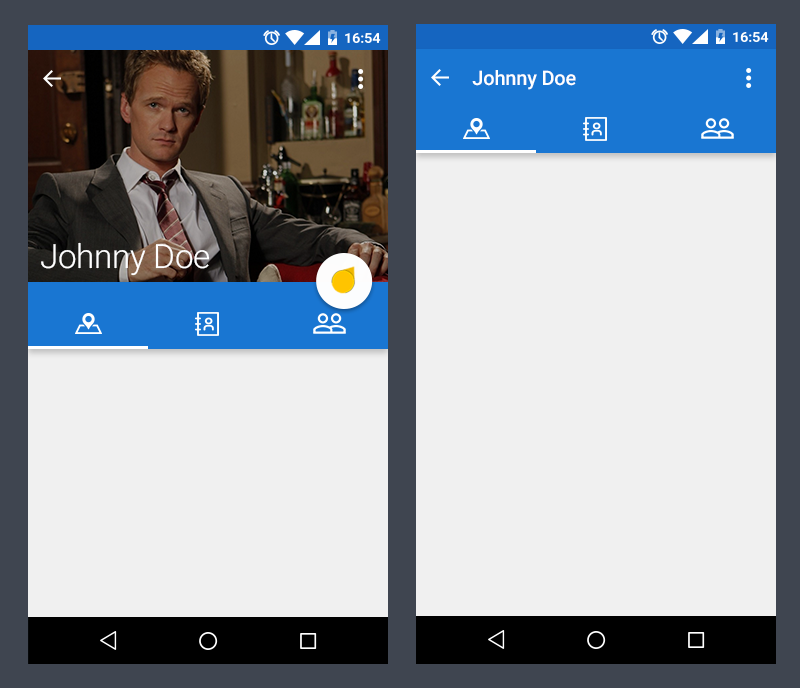
뱅크샐러드 및 야놀자 등 상단 탭영역이 접히는 UI/UX를 프로젝트에 적용하고자 했다.
구현을 위해 고르게 된 layout은 CollapsingToolbarLayout으로, 이름은 Toolbar로 딸려있지만 컴포넌트들을 추가해
툴바 이상의 요소들을 보여줄 수 있는 걸 확인할 수 있었다.
처음에는 레이아웃 코드 적용 후에도 동작이 되지 않거나, 스와이프 중 뷰가 제대로 접히지 않고 따로 논다던지 등의 이슈가 있었는데,
이하 문제들을 해결하면서 적용한 요소들을 정리를 해두고자 한다.
이번 구현에 있어 공식문서 외에 실구현 사례들을 레퍼런스로 삼아 차이점이 존재할 수 있으니, material.io에 나와있는
공식문서를 참조하는 것도 좋을 것 같다.
Collapsing Toolbars - Material Components for Android
CollapsingToolbarLayout is a ViewGroup that provides many of the visual characteristics and interactions for collapsing toolbars specified in the material guidelines. To create the collapsing toolbar, CollapsingToolbarLayout integrates with AppBarLayout, C
material.io
1. 기존 ConstraintLayout 코드 내에 CoordinatorLayout을 따로 추가한다.
- 배치의 경우 상단에 남겨두고자 하는 상태창 영역(scroll_view) 아래부터 화면 전체를 채우도록 했다.
- 처음에 CoordinatorLayout 없이 적용을 해보았으나 동작하지 않았으며, 필수적으로 들어가야 하는 것으로 보임.
<androidx.coordinatorlayout.widget.CoordinatorLayout
    android:id="@+id/collapsing_test"
    android:layout_width="match_parent"
    android:layout_height="0dp"
    android:background="@null"
    app:layout_constraintTop_toBottomOf="@id/scroll_view"
    app:layout_constraintBottom_toBottomOf="parent"
    app:layout_constraintLeft_toLeftOf="parent"
    app:layout_constraintRight_toRightOf="parent">
2. 추가한 CoordinatorLayout 내에 AppBarLayout을 추가한다.
<com.google.android.material.appbar.AppBarLayout
        android:layout_width="match_parent"
        android:layout_height="wrap_content"
        android:background="@null"
        android:theme="@style/ThemeOverlay.AppCompat.Dark.ActionBar">
3. 추가한 AppBarLayout 내에 CollapsingToolBarLayout을 추가한다.
<com.google.android.material.appbar.CollapsingToolbarLayout
            android:id="@+id/htab_collapse_toolbar"
            android:layout_width="match_parent"
            android:layout_height="wrap_content"
            android:fitsSystemWindows="true"
            android:background="@null"
            app:titleEnabled="false"
            app:layout_scrollFlags="scroll|exitUntilCollapsed">

</com.google.android.material.appbar.CollapsingToolbarLayout>
4. CollapsingToolBarLayout 내에 접고자 하는 layout을 추가한다.
이때, 접히는것 이외에 collapsing 효과를 주고자 한다면 app:layout_collapseMode="parallax" 등을 추가해주면 된다.
height의 경우 펼쳐졌을 때 유지하고자 하는 height의 사이즈를 입력하면 된다.
( 관련 옵션은 아래에서. )
CollapsingToolbarLayout.LayoutParams | Android 개발자
CollapsingToolbarLayout.LayoutParams This package is part of the Android support library which is no longer maintained. The support library has been superseded by AndroidX which is part of Jetpack. We recommend using the AndroidX libraries in all new proje
developer.android.com
<androidx.constraintlayout.widget.ConstraintLayout
                android:id="@+id/main_app_bar_contents"
                android:layout_width="match_parent"
                android:layout_height="130dp"
                android:background="@null"
                app:layout_collapseMode="parallax"
                app:layout_constraintBottom_toBottomOf="parent"
                app:layout_constraintTop_toBottomOf="@id/main_app_bar_header">
5. Tablayout을 CollapsingToolBarLayout의 바깥에, AppBarLayout 안에 선언하고, Tab의 아래 영역에 보여주고자 하는 요소들을 집어넣으면 된다.
본인의 경우 SwipeRefreshLayout과 ViewPager가 적용되었음.
...

</com.google.android.material.appbar.CollapsingToolbarLayout>

        <com.google.android.material.tabs.TabLayout
            android:id="@+id/tabLayout"
            android:background="#9C0C0C"
            android:layout_width="match_parent"
            android:layout_height="wrap_content"
            android:layout_gravity="bottom"
            app:tabTextColor="#000000"
            app:tabGravity="fill"
            app:tabMode="fixed"
            />
    </com.google.android.material.appbar.AppBarLayout>

    <!-- 넣고자 하는 것들을 집어넣자. -->

</androidx.coordinatorlayout.widget.CoordinatorLayout>
< 참조 >
CollapsingToolbarLayout with TabLayout
CollapsingToolbarLayout with TabLayout. GitHub Gist: instantly share code, notes, and snippets.
gist.github.com
Android: CollapsingToolbarLayout with ImageView Toolbar background
I would like to implement a CollapsingToolbarLayout like this: The challenge here is that I need to have a custom Toolbar with a gif as background and therefore I need an ImageView as background f...
stackoverflow.com
'ANDROID > UI - UX' 카테고리의 다른 글
| [안드로이드] SeekBar의 Thumb 색상 실시간 변화주기, BlendModeColorFilter 사용하기 (feat. ColorFilter deprecated) (0) | 2020.03.05 |
|---|---|
| [안드로이드/MpAndroidChart] MpAndroidChart에서 Marker 커스텀하기 (0) | 2020.02.25 |
| [안드로이드] RecyclerView에서 클릭한 아이템의 position을 간단히 받아오기 (0) | 2019.11.13 |
| [안드로이드 | 코틀린] 사용자 정의 커스텀 달력 만들고 ViewPager에 접목하기 (0) | 2019.11.04 |
| [안드로이드 | MpAndroidChart] 바 그래프의 하단 영역이 생길 때의 대처법 (0) | 2019.10.30 |


